This post may contain affiliate links. If you use these links to buy something I may earn a small commission at no cost to you. Thanks.
…
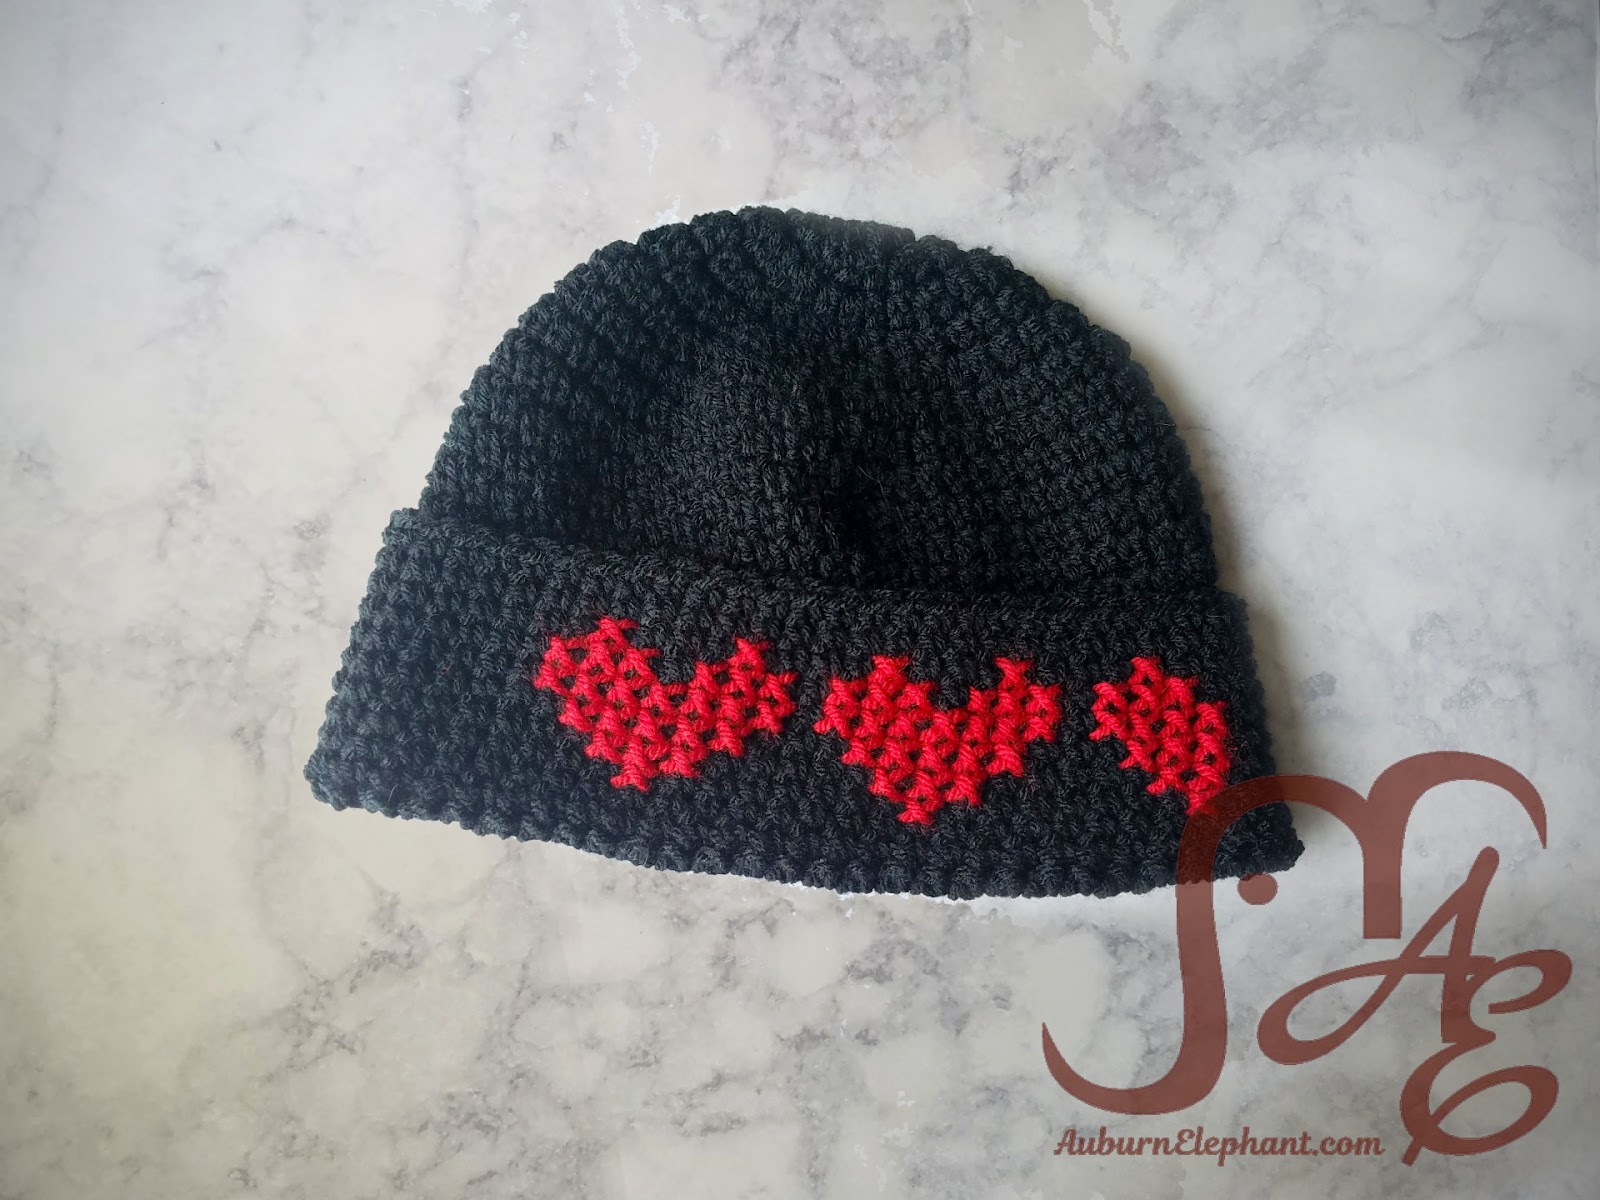
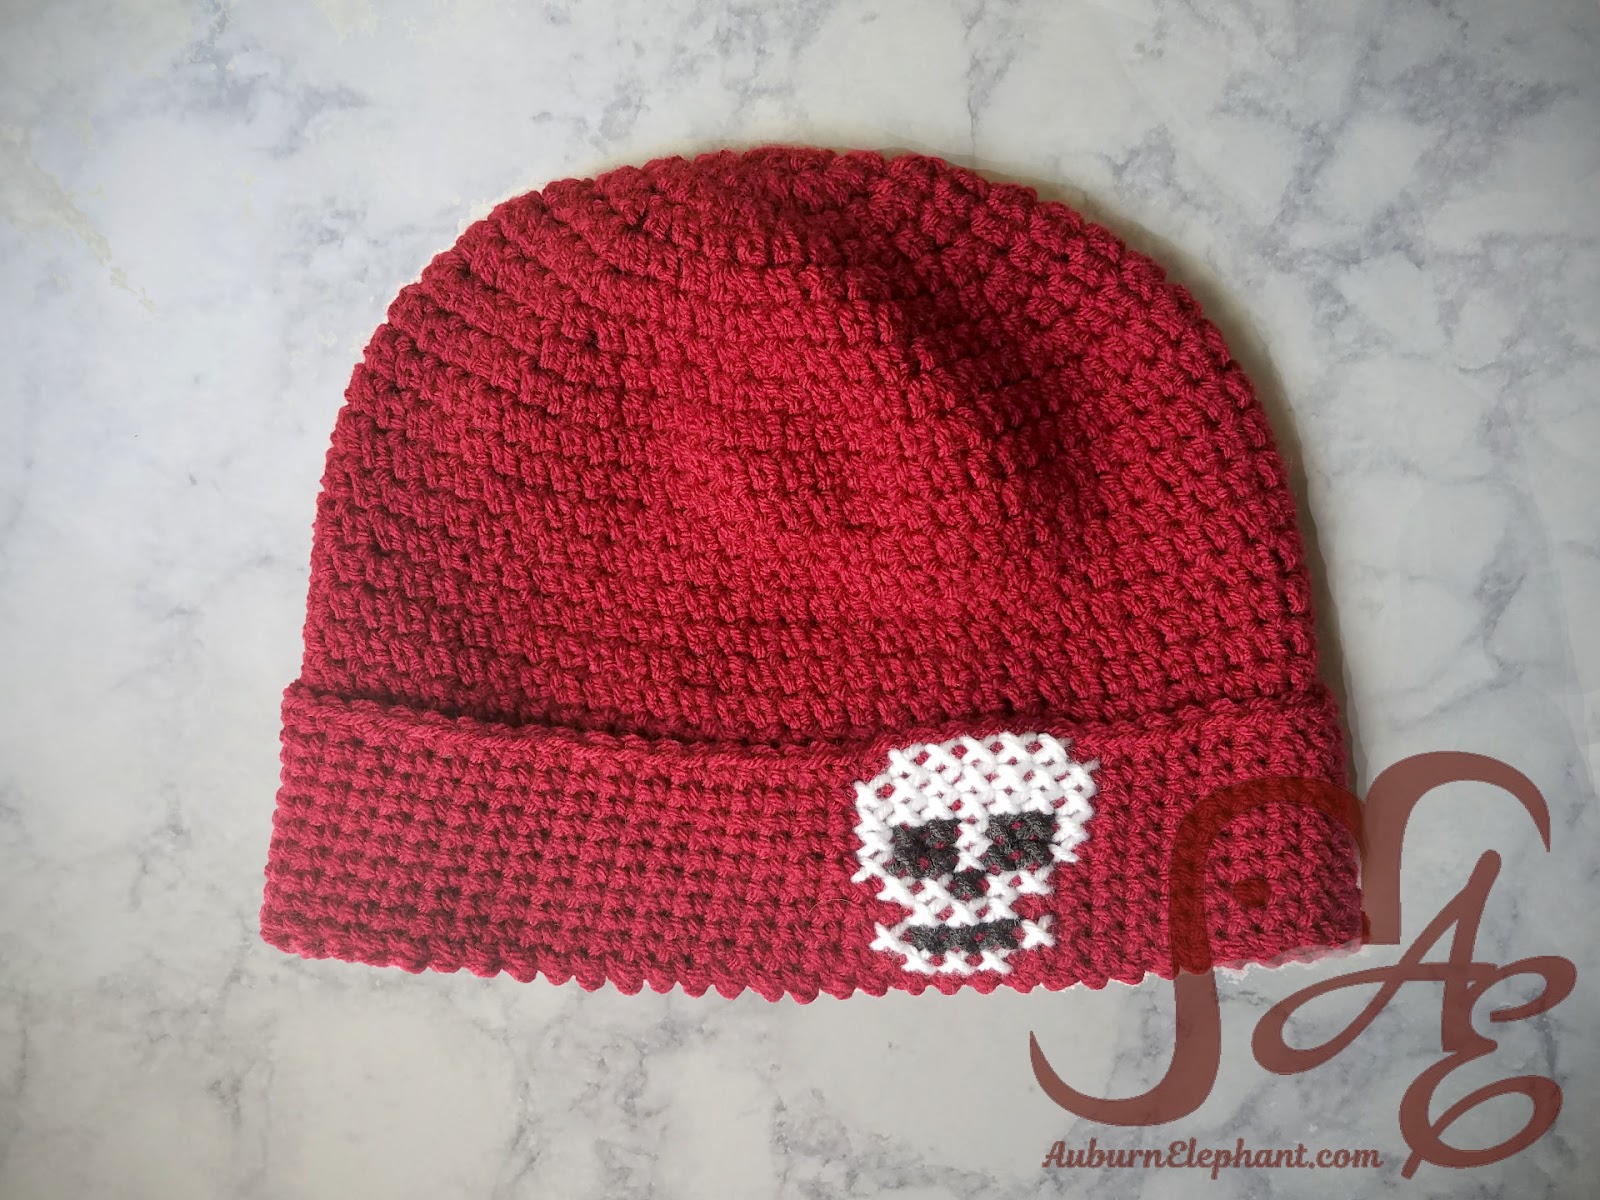
I have been doing so many graphgans lately I was relieved when I had someone finally ask for a hat! But I couldn’t completely get away from graphing, I guess. I had seem some crocheters using a Tunisian simple stitch and cross stitching their graphs on instead of actually doing all the color changes. I thought it was so interesting! (And now I’ve realized it isn’t that uncommon apparently, but I hadn’t come across it before!)
I was also introduced to the Extended Single Crochet (ESC) a few months ago and thought it was super cool too! I wanted to try it in a hat. I love the stitch’s texture! It’s super simple to do as well. I wanted the brim to be in the SC though so that the stitches were more square like they should be with cross stitching.
For me I used I Love This Yarn from Hobby Lobby and a size J hook to get a good square. You might want to do a small swatch to see if yours comes out the same. Try doing- 10 SC stitches and 10 rows, or some other even square shape, and see if yours are close. If not, change your hook size. Keep in mind though, changing your hook size can alter the sizes listed in the pattern.

Owen asked to take my picture and this was the result. It’s not that bad for not being prepared at all to have my photo taken.

The hat looks cute too! 😉
A couple of disclaimers: This pattern is intended for personal use only. You are welcome to use the pattern to make and sell products, to keep for yourself, or to give away as gifts. I would appreciate receiving credit and a link back to the site, however. Please do not republish or distribute the pattern in any way, or use my photos in your listings.
I am not a robot, so if you find any typos, errors, or places that need clarification, please let me know so that I can fix my mistakes or explain things differently. 🙂
I hope you enjoy this crochet pattern. If you have any questions or comments you can leave them below OR email me at auburnelephant@gmail.com OR through the contact page on this site. I’d also love to see your finished creations! 🙂
Cross Stitched Brim Beanie
Supplies Needed:
I Love This Yarn, Medium Worsted Weight 4 (100% Acrylic, 355 yds, 7 oz) any color, 1 skein, any color for designs, small amount
J/10 6.0 mm Hook
Tapestry Needle
Stitches Used:
Ch- Chain
Sl st- Slip Stitch
Special Stitches:
ESC- Extended Single Crochet- Insert hook into stitch, Yarn Over, Pull Through (2 loops on hook), Yarn Over, Pull Through 1 loop, Yarn Over, Pull Through remaining loops
2ESC- Extended Single Crochet Increase- Do 2 ESC in same stitch to increase.
Each size will be worked in joined rounds. Begin each round with a Ch 1 and end with a Sl st to the first stitch of the round. Chains do NOT count as stitches.
Small
1) Using the Magic Ring technique (OR Ch 3 and join with a sl st to first chain to form a ring) ESC 10. (10)
2) 2ESC in each around. (20)
3) *ESC, 2ESC in next* Repeat from * to * around. (30)
4) ESC in each around. (30)
5) *ESC in next 2, 2ESC in next* Repeat from * to * around. (40)
6) *ESC in next 3, 2ESC in next* Repeat from * to * around. (50)
7) ESC in each around. (50)
8) *ESC in next 9, 2ESC in next* Repeat from * to * around. (55)
9-20) ESC in each around. (55)
21) Ch 1, Turn. (You can also flip the hat inside out at this point if you find it easier. We turn here so that the “right” side of the SC brim will be out once it is flipped up.) SC in each around, 2SC in last of round. (56)
22-30) SC in each around. (56)
Finish Off. Leave a long tail to sew brim down after you’ve added the cross stitching.

Medium
1) Using the Magic Ring technique (OR Ch 3 and join with a sl st to first chain to form a ring) ESC 10. (10)
2) 2ESC in each around (20)
3) *ESC, 2ESC in next* Repeat from * to * around. (30)
4) ESC in each around. (30)
5) *ESC in next 2, 2ESC in next* Repeat from * to * around. (40)
6) *ESC in next 3, 2ESC in next* Repeat from * to * around. (50)
7) ESC in each around. (50)
8) *ESC in next 4, 2ESC in next* Repeat from * to * around. (60)
9-22) ESC in each around. (60)
23) Ch 1, Turn. (You can also flip the hat inside out at this point if you find it easier. We turn here so that the “right” side of the SC brim will be out once it is flipped up.) SC in each around, 2SC in last of round. (61)
24-32) SC in each around. (61)
Finish Off. Leave a long tail to sew brim down after you’ve added the cross stitching.
Large
1) Using the Magic Ring technique (OR Ch 3 and join with a sl st to first chain to form a ring) ESC 10. (10)
2) 2ESC in each around. (20)
3) *ESC, 2ESC in next* Repeat from * to * around. (30)
4) ESC in each around. (30)
5) *ESC in next 2, 2ESC in next* Repeat from * to * around. (40)
6) *ESC in next 3, 2ESC in next* Repeat from * to * around. (50)
7) ESC in each around. (50)
8) *ESC in next 4, 2ESC in next* Repeat from * to * around. (60)
9) *ESC in next 10, 2ESC in next* Repeat from * to * around.(65)
10-24) ESC in each around. (65)
25) Ch 1, Turn. (You can also flip the hat inside out at this point if you find it easier. We turn here so that the “right” side of the SC brim will be out once it is flipped up.) SC in each round, 2SC in last of round. (66)
26-34) SC in each around. (66)
Finish Off. Leave a long tail to sew brim down after you’ve added the cross stitching.
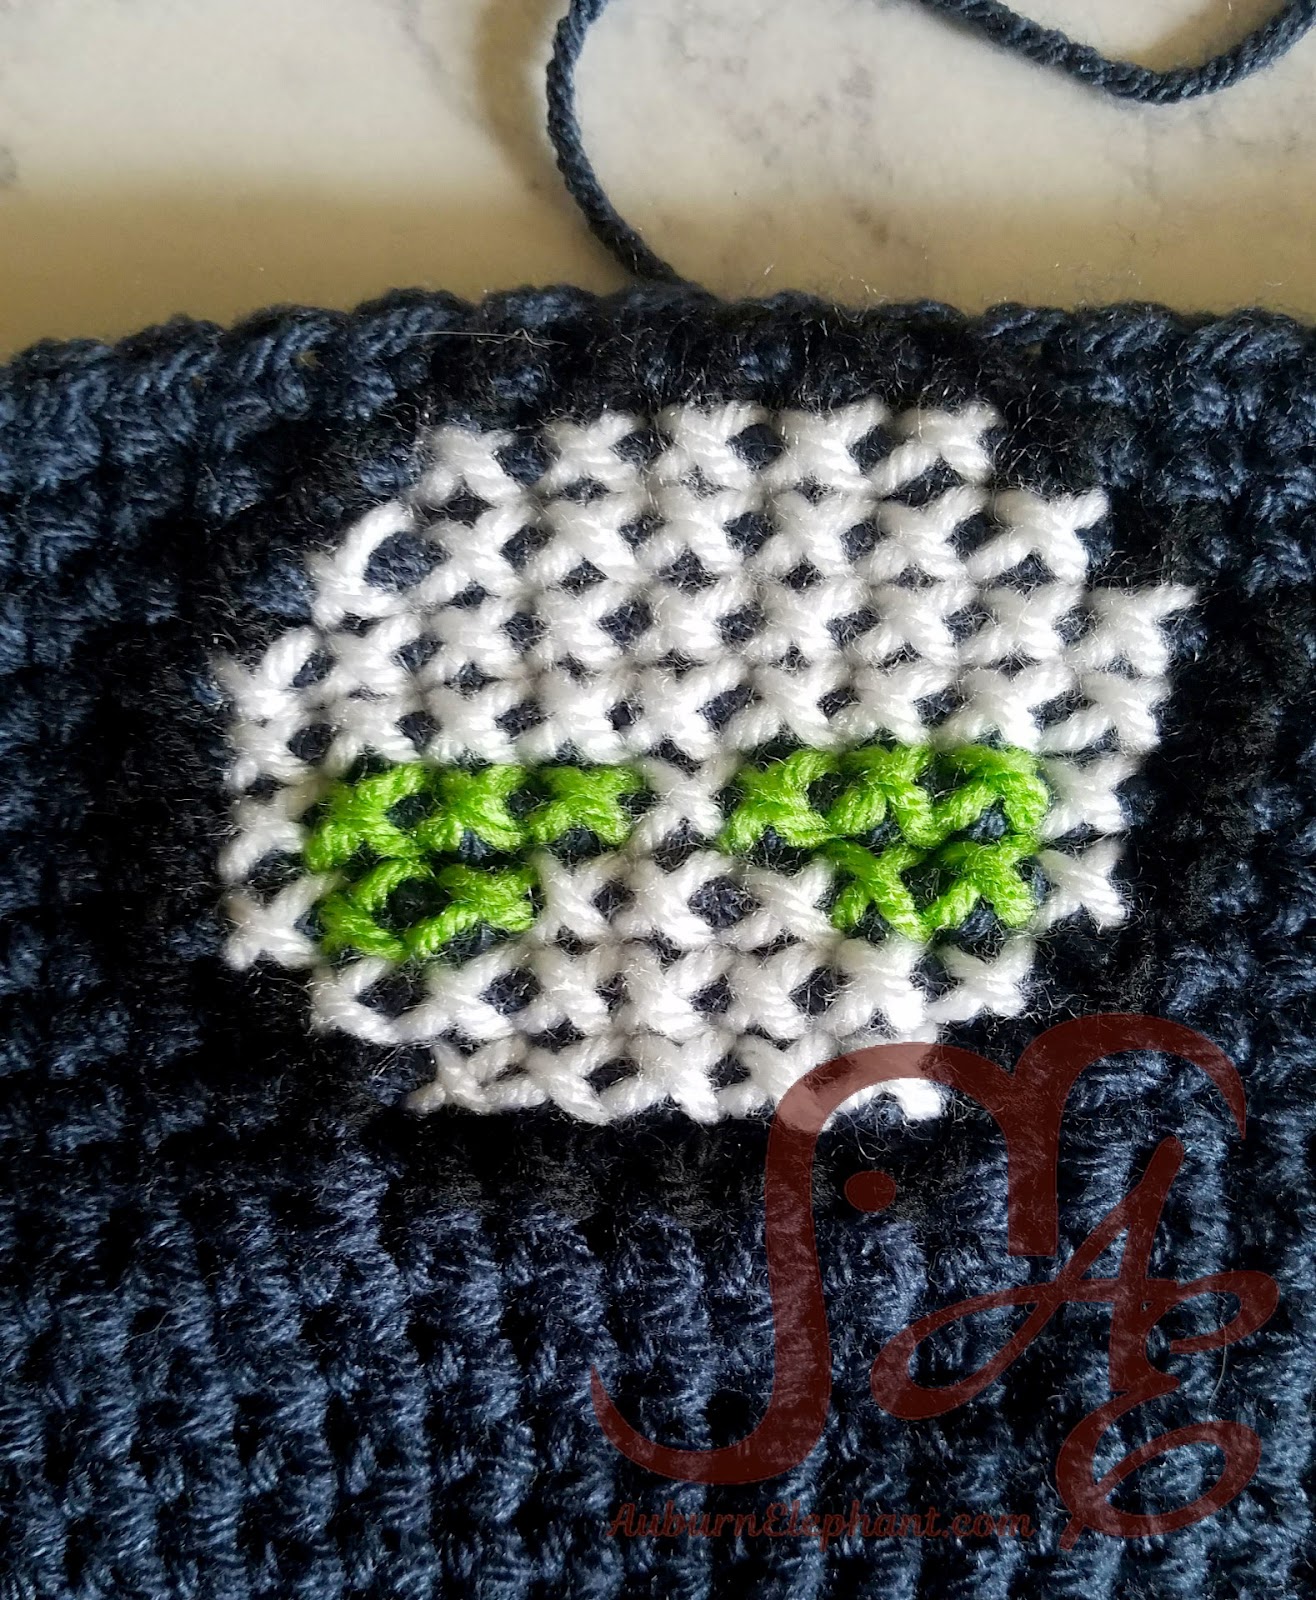
Cross Stitching
Your brim should be 10 rows of SC tall, which means you can choose any graphed image that is 10 blocks high or less. Also, keep in mind that if your graph is too wide, it might be hard to see when it is on a head.
If you aren’t familiar with Cross Stitching don’t worry. You can skip that part and just have a basic brimmed beanie. Or you can give it a shot on this small scale.
I’m definitely not a pro at cross stitch, although I have caught the bug and plan to do some more of it coming up. I love combining it with crochet. It’s a slightly less tangled way to graph!
Here’s how I approach my cross stitching.
- Find the Graph that you want to use
- Determine where you want the graph to be on the brim of your beanie. (Make sure that you will have enough space for the entire image.) I always try to center the seam in the back of the hat and then off-set the image a little to the left.
- I start on the top row of my graph and follow it from left to right, one color at a time. So if there are multiple colors in the graph, I will do all of one color and then move on to the next.
- I work each block on the graph from bottom left opening to the top right all the way across. Then I return on the same row going from bottom right opening to the top left back across. This forms the little “X’s”.
- I keep using that same technique for each row across until I get to the end. And repeat with any additional colors
If you are more familiar with cross stitching and have your own method, go for it! I’m not even sure if I use the suggested technique but it’s working for me.
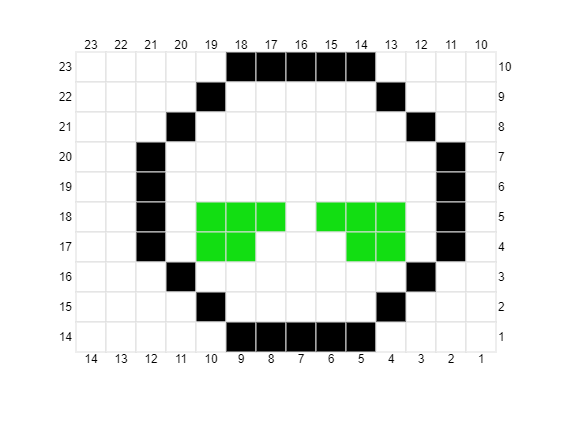
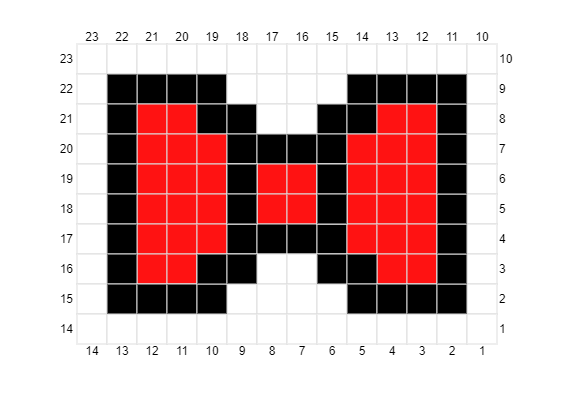
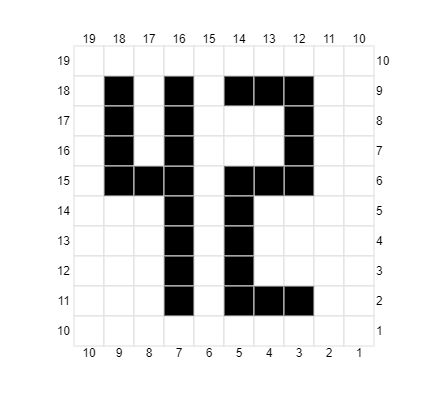
Below are some of the graphs that I came up with to use. (Very geek-oriented if you can’t tell) But you are free to use anything you can come up with or find. There are lots of graphs out there, just search for crochet, cross stitch, or perler bead patterns!
Graphs
Below are a few of the graphs that I came up with for these hats. Like I said, mostly geeky but there are lots of variations you could use too. (The skull graph I used is not my own. It was easily found on Pinterest.)